Shabby blogs

Sunday, November 14, 2010

Love of My Life Layout


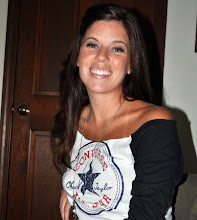
I had so much fun working on this Layout! I have wanted to do one of my husband and I for a while, but it always seems like we never get pictures together because one of us is always behind the camera! Well this particular day I made a point to have my Mother-in-Law snap a few of us! I have been so excited to use this paper June Bug from Basic Grey... I just LOVE the rich colors! When I printed my photos I thought that the paper worked just perfect! I did use the June Bug for the entire layout with the exception of the very back base/border that you see in the blue pinwheels- that is Echo Park's (a walk in the park)
As far as putting this layout together, it was super simple. I cut some random square and rectangle shapes for behind the photos to add some dimension and patterns. I also cut some solid black and white cardstock to make a mat for my photos to mimic the look of Polaroids. I loved this because it was so easy to do and really became a focal point for me. To add some detailing I cut a heart out of the orange background in the bottom right hand corner; this way some more of that blue pinwheel paper makes more of an appearance. Then, I used my sewing machine to add a simple stitching around the entire orange base to create a second border. Last, I added a few personal touches by hand painting the word love and attaching a fortune in the top right hand corner. I actually got this fortune on one of mine and Joe's first dates! Its been something I have held on to for years and is finally getting put to a good use!

Thursday, November 4, 2010

Since I am in the Birthday mood...


Here is another Birthday Card that I made back in May and never posted. I absolutely love this card because I got to use one of my favorite paper companies- October Afternoon! On this card I actually combined two different lines from October Afternoon; there is some Fly a Kite and Thrift Shop. (Both great lines) Other than that I used blue smoothie and valentine Core'dinations paper for some solids. The front of the card is so fun because I mounted the little pin wheel in a way that it actually spins! To me the "fun" aspect just screams Birthday!!

My favorite part of this card is the inside. On the occasions where I get someone a gift card, I love to have a fun/cute way to give it. So for this card I made a little pop-up envelope to hold the gift card. It gives that "wow" factor and is so easy to do! Hope you like it. :)

If you want more details on the card like Cricut Cartridges used, I will post that below the pictures. Hope you

If you want to make your own envelope like this one below, you can find this on the Just Because Cricut Cartridge pg. 68

To make this card you will need the Just Because, Create a Critter, and Sweet Treats Cricut Cartridge. The main card base, the card base liner on the inside, the envelope for the pop up gift card inside, and the main envelope can all be cut from Just Because.
Everything to make the pin wheel and the Happy Birthday phrase found on the inside can be found on the Create a Critter cartridge. Lastly, the little tag on front that is stamped with enjoy can be found on the Sweet Treats Cartridge. If you need specific details like sizing and page numbers... feel free to write me anytime and I will be more than happy to send you the information.

Monday, November 1, 2010

Happy 21st Birthday Amber!!!

My Best friend Amber Chylsta is turning 21 and so I had to make her card! I just LOVE this paper from Imaginisce!! The colors and patterns are too cute. This particular line is B-day Bash and I intend to use it again on a layout of her Birthday Party when we go out to celebrate! I had so much fun making this card and hope that she loves it!


Monday, October 25, 2010

A little Cricut Kitchen Decor'


This is something I created using some 8x8 Canvas, Acrylic Paint, Cricut Stencil Material, My Cricut, and the Preserves Cartridge. Once you have these materials you can follow these simple steps to create your very own kitchen wall art. It really has an art deco feel that will just make your kitchen pop with some color!

For the Pear, you will need to turn to page 26 in your preserves cartridge. From that page you can make the following cuts using your Cricut Stencil Material.
cut at 7"h
cut at 7"h
Layer cut at 7"h

Once you have these images cut you then start by painting the background of your canvas first! ( I learned that the hard way) LOL. Then you simply start to paint each part of the pear in sections. For the first layer (being the main base of the pear) you want to use the negative part of your cut so that you are painting the actual shape of the pear and the whole inside versus just tracing the actual pear cut and not being able to paint the inside with a stencil.
Side Tip- Make sure to remove the clear film on your stencil material so that the stencil sticks nicely to your canvas insuring that your stencil does not move while painting and gives you a much cleaner look. Also, use a dry brush with light coats of paint and then do 2 to 3 coats before you move on to your next pear layer. This is a little more tedious but makes your art turn out nice and clean! One more thing!- use a heating tool to dry each layer of paint to tons of time and get your project done in a jiff!
Now you can move on to painting the cream colored inside of your pear with one of your pear layers and then use the main pear cut out to paint in your brown or black seeds. You might find that certain cuts are easier for you to paint each of your layers so play around with it. :)

The steps are the same for the apple and cherries but here are the dimensions to get the correct sizing on an 8x8 canvas.

Apple- pg. 27
cut at 6 1/2" h
cut at 6 1/2"h
Layer cut at 6 1/2"h & Layer+shift key

Cherries- pg. 48
cut at 6 1/2"h
cut at 6 1/2"h
Layer + Shift key cut at 6 1/2"h
Layer cut at 6 1/2"h


Wednesday, October 20, 2010

A little bit more Summer!


This is a layout of my son Evan. I couldn't resist doing one on him at the water park this summer. We were there every week and he learned how to swim during the first month! He is only 3 so I was soooo proud when we got it down!! As soon as he figured it out he was off to the "big boy" slides; where he just went down them over and over until it was time to go home.

To get this layout I used the Bo Bunny Sun kissed line. The only paper that is from a different line is the main base that you see in brown. That is from Echo Parks- A walk in the park. I also used some Jillibean corrugated Alphas. They come in your basic cardboard color so I jazzed them up with come acrylic paint to match my color scheme. Next, I embellished up the page with some tiny Artisan Elements from Pink Paislee (those are fun too cause you can paint, spray, or ink them to match) in this case I inked mine purple. Last, I added some pop dots for dimension, a red button from Jillibean, and did some journaling with the oh so wonderful Uni-ball white Signo pen. Hope you like it!

Wednesday, October 6, 2010

Halloween is on the way!

Lately I have been so busy with my move and getting Evan settled in Pre-school! So far everything is working out great and we couldn't be happier with all the changes! However, I am packing up for our family trip to Texas and have not had the crafting time I so desperately need.
I still wanted to post some Halloween projects since it is one of my FAVORITE times of the year; so here are my latest Halloween projects that I made during the spring/summer. This first one is a Halloween Invitation... I have to make a new one every year! It is all done with the Cricut but I added a few twists to the cuts. You will notice that the front of the card is a fence that I cut using the Heritage Cartridge. I love it because I would have never expected to find a cut for Halloween on this cartridge but with a few added touches it really has a new spooky feel to it. I simply cut the fence in half to have it open like a gate and then covered it with Rangers black embossing powder. The embossing powder really brings it to life with the shinny look and texture. For the main base I used the Cricut to cut two basic rectangles with rounded edges. I kept the back piece intact (which is used for the inside info) and cut the top rectangle in half so that it could act as the back drop for the gate. I then used my sewing machine to attach the back base to the top front pieces by sewing the outer edges. This really made the card open and close perfectly without the worry of it coming undone like it might have with glue. Once the invite is opened... your guests will find all of the party details! Hope you like this one. :)


This next project is just a little counter top sign to bring in some Halloween Decor'. I really love this sign because it is double sided giving you the option to change it up a bit! This was done mainly on the Cricut as well and was super easy! Just a small tip... I cut the main base (rectangles) out with the decorative card-stock for the front and back as well as some chipboard to give it more sturdiness. I just covered the chipboard with the decorative paper so you never even see it! For the most part the cuts where just basic designs found on the cartridges but for the black spooky tree found on the Happy Halloween side I used a cool technique. I cut the tree from card-stock and then used the negative piece left over. (so I tossed the actual tree that was cut and saved it for another project, then used the piece that is left over that is just the outline of the tree). Once you have the outer cut you then spray the back side with repostionable glue to make it tacky. This keeps the paper from moving around while you are working with it. I then placed the sticky side down onto the cream colored oval and then brought out my Tim Holtz Black Soot Distress Ink and Ink Blending tool. Once you have this, cover your tool with ink and color inside your negative space. Once good and covered the repostionable glue then allows you to remove the cut out of the tree without messing up or tearing your paper underneath. Now you have an image that looks like its a part of the card-stock giving a totally different look! Put some pop dots under the sparrow and you will really have some dimension.


Monday, August 30, 2010

Something New!!! :)


Well, I am finally posting again and I will NOT let so much time go by next time! There have been a ton of changes going on in my life and things are finally starting to settle down. :)
First, I really wanted to start with a Layout. I really think Layouts are my FAVORITE paper craft to make! There are just so many fun papers and embellishments to play with and the fact that you get to display your favorite pictures in some really cool ways! I just couldn't resist doing a layout with this picture of my niece/God-daughter Lily. I am sure you can figure out why...
In this Layout I used a cool turquoise blue from Bazzill as the main base. All of the fun patterned paper comes from Bo Bunny's Sun Kissed Line. Now this is a really bright & colorful paper line to work with. I have a ton of amazing summer pictures that I am making layouts with right now and actually this paper line is what inspired me to take the pictures! It was really neat to be inspired this time into taking a certain type of picture because of something as simple as paper!! Inspiration truly comes from all around us! :)


This next project is just a simple little thank you card that I made for my Mother-in-Law.
I just started with some yellow Bazzill paper for the main base. Then covered that with patterned paper from Echo Park Paper Companies (a walk in the park) paper line. I LOVE this paper!! Its so fun and it could be used for anything from a little girls layout to something with a little more sophistication like this card. Hope you like!


Sunday, May 9, 2010

Mothers Day Cards


These are a few mothers day cards that I whipped up. I really didn't have as much time as I would have liked but I still LOVE them! I am really into the old fashion vintage look right now. Its just too cute!
I really didn't do any special techniques or anything so you can probably get the general idea of how each one was made just by looking at the pictures.
Hope you like them! :)

This first card is made with all Cosmo Cricket Material girl... one of my favorites! What I like to call a "fun" line.
This next card is made all with GCD's paper line by Melody Ross called Homespun Chic! Another great vintage line! I LOVE it because both of these lines are vintage but have completely different looks.


Wednesday, May 5, 2010

Flea Market Finds

These are just a few pictures that I took while at the Flea Market this Sunday. I must say that I really did find inspiration in all of the vintage and artsy collections. Most of the booths that caught my eye were what I would call Shabby Chic and Country Cottage. It was very cloudy... so the pictures are not as great as I wanted them to be. However, they are still fun to look at! Hope you can find something that inspires you. :)
This last picture is just a tree from my back yard. I LOVE IT!!! Hello Spring!

3 friggin cute animal pics!


Over the past week I have gotten some of the cutest and funniest shots with my camera! I just LOVE them all. Let me know what you think! :)

This first one is my kitty Monty! He was about to jump over the fence to torment our Neighbors dogs. They have 5 big dogs and all of them are scared of our little cat Monty! LOL! He looks like he thinks he is King or something. I love it!
This next picture is one that I caught at the local zoo next to our house. You cant see it but there were 2 others ducks up above. This duck looks like he is looking around the corner for them!
Too funny!

Now this one is the BEST! My friends and I were shopping around a little town before we went to the Flea Market and this beautiful dog came up behind us. We stopped to pet him for a minute and then he went on ahead. We soon caught back up to him because he was stopped in front of one of the shops. We were are saying that we wondered what had his attention and we were thinking it must be a food place or something. LOL! Well once we got up close we soon found that it was the cutest little kitten ever!!! The dog was so excited and just wanted to play!! :) The kitten just sat in this position the whole entire time! Right when I took the picture I caught the dog pawing at the glass! Perfect timing!!


Thursday, April 29, 2010

Is this not the cutest layout ever?!


Okay so ya'll might think that I am crazy but I know what I love the second I lay my eyes on it! I was browsing some different blogs and websites and stumbled upon this layout. TOO CUTE!!! Does anyone have an idea what paper line the frame and what looks to be like chalkboard paper are?

Saturday, April 17, 2010

Good Food, Michigan, & Tim Holtz!


Natalie and I were invited by our girl Sarah from Notions Marketing to come join her in a workshop with Tim Holtz! This decision was a NO-BRAINER!!! Before we knew it, we were on a road trip to Grand Rapids, Michigan. It was only a 4 hr drive but we still managed to have some fun along the way! First we stopped at a little orchard/restaurant in Fennville, Michigan...a place called Crane's Pantry. We had to drive a little ways off of the main interstate but let me tell you it well worth it! Besides all of the vintage decor' that had been collected since they opened the doors back in 1916, there was an excellent choice of meals and FANTASTIC homemade pies!! I cant have sweets so I just about jumped outta my seat when I saw they had SUGAR FREE pies as well!! WOOOOHOOOO!! Anyways, enough of my blabberin... here are some cool pics. :)

Ohhhhh how things have changed. :)


I wish I could have gotten I better picture of this one. It was one of my favorite things because of all the old prices. Now those were the good 'ol days!
So Cute!
We also stopped at little antique store. I LOVE places like this but I must say...this one was a little scary.
We had to get a picture of this. We were in the hallway of our hotel going to our room and noticed right away that the doors were not your standard size...


Some crazy wall art
These are some of the fun tags we made with Tim!